Part 1: lightmetering and exposure
Part 2: focussing and sharpness
Part 3: real life situations
In order to get a decent picture, you need to focus correctly (this doesn't necessarily apply to some kind of parties, where fuziness is desirable for conveying the atmosphere...).
It depends on the type of camera you have, how to do this. With a single lens reflex the photographer views by means of a mirror and prism system. While focussing, you can exactly see in the finder what will be in focus and what won't (except for depth-of-field, see below).
With rangefinder cameras focussing is done by overlaying two images in the middle of the finder. You can see what you are focussing at, but the image in the finder is in focus anyway, as you don't look through the lens.
See also: medium format: camera types
Whatever camera you use - the choice of what you focus on should be yours. OK - but what point to choose? Suppose you want to make a photograph a rose shrub. On what point do you focus. Working from a distance, you could choose the entire shrub. As soon as you come closer: that rose on the left hand side, or the but in the middle, or...
The point of focus is often defined by the subject itself (for a portrait you probably want the eyes to be sharp - the ears can be out of focus) or by the composition (the rose close to the camera is in focus, the rest of the shrub not).
Take care to make this choice consciously - don't trust your camera to do this for you. Autofocus cameras seduce you to do so (although you can make a conscious use of the autofocus system!), but some finders in manual focus camera do so too: right in the middle there are the microprisma or the rangefinder WIG.
The right sequence is: first decide what to focus on, then focus and then reframe the shot. This can be done on point&shoot and autofocus cameras by pressing the shutter button halfway (the camera then focuses on the subject in the middle), and reframe while keeping the button pressed.
Autofocus systems keep getting better. More focussing point, better software for evaluating all kind of situations.
Nevertheless, there are typical situations where most AF-systems are in trouble. For instance when there is only a little amount of light (this can be solved by some cameras by throwing an (infra)red pattern on the subject, and then focus on that pattern) or when the subject lacks any contrast.
Autofocus systems need some pattern of brighter and darker parts to focus. Is there no such pattern, like in the case of a white washed wall, or is the pattern to regular, like in the case of a fence, than the autofocus might 'hunt' - looping from close to infinity and back again. This is quite annoying when you are about to shoot the next world press photo!
An extra problem under these circumstances are the fact that most autofocus zoomlenses aren't that fast (in other words, only a little amount of light gets through the lens to the focussing module). With a faster lens, like a 2.8 zoom instead of your 4-5.6 or even better a 1.4 prime, the camera will be able to focus faster and more accurately. The same applies to manual focussing, by the way!
The high end autofocus cameras offer even more focussing technology, like continuous focussing. Here the camera keep focussing as soon as the subject moves.
In focus trap mode you can for example focus on a fence first and the camera exposes as soon as the horse and jockey reach that particular fence. In other words: it exposes as soon as the moving subject reaches the point of focus.
 I will not discuss here the question AF vs MF in any length. It depends so much on the genre you work in, the tools you have (the quality of autofocus depends on the camera) and your vision (literally - autofocus is a gift to ageing eyes).
I myself never use autofocus, not even at weddings and parties. I anticipate as much as I can on what is going to happen and where it is to happen. I am also afraid the autofocus won't work at the decisive moment. But I know others, who have been working a lot with their cameras and know how they perform, to get the same consistent, perfect results.
To focus well with a manual focus camera, it is important to have a good screen in the camera. Some autofocus don't offer these, as the camera engineers suppose you will trust on the camera's autofocus.
Camera that let you choose the screen yourself, are the best if you are into some specialist field of photography, like astrophotography, microscopical, etc.
In cases of emergency, for instance when it is too dark to focus correctly, you can rely on the distance scales. If you doubt whether you focussed adequately, you take a look at the scale. Some feeling for distances comes in handy! [ You can see a general example of such a scale here. ]
Focussing, as described above, is all about sharpness in the so called plane of focus. [ When you set the lens for a distance of 5 meter, everything at 5 meter from the camera is the plane of focus. Everything in that plane will be, well, in focus. ]
But what about the parts in front of and behind that field? Now we are talking about depth of field (also known as DoF).
Suppose you make a picture of a tree avenue. The camera is in the middle of the avenue, the first trees are two meter in front of it, the next ones five meter, eight meter, etc.
When you focus on the trees at five meter distance, will the other trees be in focus, or not? That depends. Are these trees within the DoF or not?
 So depth of field is about those parts in front of and behind the plane of focus, that are rendered sharp anyway.
The amount of DoF depends on three things: aperture, focal length and the relative size of the subject (also known as magnification). The smaller the aperture, the larger the DoF, the shorter the focal length, the larger the DoF, the smaller something in the picture (thus the larger the camera - subject distance), the larger the DoF.
In other words: a picture made at f2 will have less DoF than one made at f11; a wide-angle lens has at a given aperture more DoF than a telephoto lens; a picture of a tree will have more DoF than a portrait of a flower.
This has also as a consequence that a standard lens on digital P&S had more DoF than a standard lens on a film SLR: the chip is far smaller than the film area of a 35mm camera, and there for the focal length of the digicam's lens will be a lot less. [ The angle of view will be the same, though! ]
The same applies for 35mm versus medium format: the standard lens for 35mm slr's is 50mm and has more depth of field than a 80mm standard lens for a 6x6 camera.
Important: the focal length of many digital P&S cameras is given in 35mm equivalent. The lens says for example 35-105mm, because the angle of view (from wide-angle to telephoto) of this lens is the same as for a 35mm camera. The real focal length of this camera is maybe 7-21mm. The ratio of chip to film area is the same as 7 to 35 or 21 tot 105. And that is why the angle of view is the same.
Mind though that the depth of field does not depend on angle of view, but on focal length. And for a 7mm and even for a 21mm lens, almost everything, from near to far, will be within its DoF!
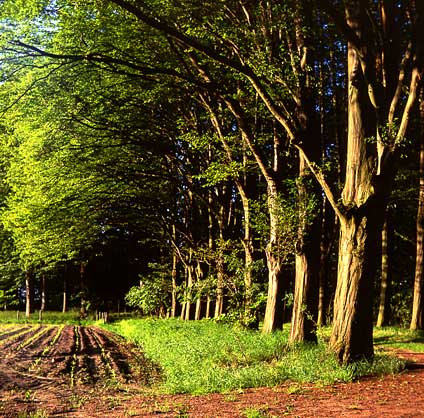
This is one of my first medium format shots. The distant trees are not really within focus -
at that time I didn't pay enough attention to the small DoF of the 80mm standard lens.
Sometimes depth of field can be a real photographic problem: you want to have everything in the frame in focus and therefore need a small aperture. On the other hand you want to work with a fast shutter speed because of the subject's movement. Not so much of problem when the weather is sunny, but impossible for a theater's stage.
Experience and experimentation is very important here. You know what choices you have and what the consequences of that choices are. Whatever you do will be a compromis, but that is more of the case in photography (and life!)
There are a few things that help you evaluate depth of field. The first one is depth-of-field button, a feature of the better SLRs. By pushing this button the camera puts the lens on its actual aperture (normally, it is wide open for better focussing), enabling you to see the D0F as it will be on the photograph.
There is problem here, though: the screen of a (35mm) SLR is often far too small to see what is within and what is outside the DoF. And at small apertures, the image in the finder will be very dark, too dark to evaluate. Larger formats are less of a pain here.
Nevertheless, for a first impression of DoF it still is a nice feature.
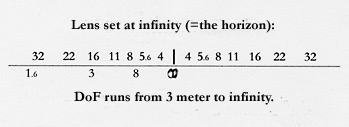
[ distance scale as on a Rollei 50mm ]
Another help are the distance scales on the lens. [ Important: most (autofocus) zoomlenses don't have these scales! ]
These scales show you the distance of the plane of focus, but also from where to where the depth of field will be at a given aperture.
Suppose you want depth of field up to infinity, then of course you could focus on the horizon. In the example above DoF at f16 runs from 3 metres to infinity.
You could also set the infinity symbol at the aperture you will make a photograph with: in this case the 16 at the right hand side. You can immediately see to what near distance the photograph will be in focus.
The distance where the actual plane of focus is, is called the hyperfocal distance. In this example that is 3 metres - DoF runs
from 1.6 metre to infinity.
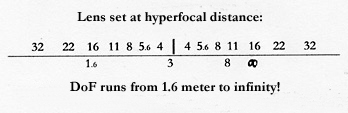
One warning though: the camera industry tends to be a little optimistic about the DoF of their lenses. When you want to enlarge the photograph a lot, it is safer to set the lens for the real exposure at a smaller aperture, then the one you'll find on the scale. About a stop will do in most cases. In the example above the distance was set for f16; the actual shot would have been at f22.
Small aperture, large depth of field. Set to hyperfocal distance.
As a consequence the shutter speed was more than one second.
There is more to say about sharpness, than correct focussing and depth of field. I discuss some of them here, that are important for everyday photography. [ I won't talk about the quality of lenses or the size of digital sensors. There are tons of information on thess topics available on the internet ].
Film: speed and size The lesser the speed, the better the sharpness. The larger the size of the film, like medium format or even sheet film, the sharper the final print.
If you want to have, as an example, a nice 50x70cm (20x28") print on your wall, you'll need to enlarge a 35mm negative about 20 times, a 6x7 negative 10 times and a 4x5" sheet negative less than 6 times. And the lesser you have to enlarge, the better the amount of detail and tonality of the print.
This higher quality comes at a price though: you will need a tripod more often, you will have to cope with less depth of field and you will have to deal with larger, heavier camera and lenses. No problem for landscape, architecture or table-top, a problem for sports, wildlife or children's portraits! For those situations, a 35 SLR or DSLR @ ISO 800 can be a perfect tool for sharp pictures.
 A moving subject or camera When a subject moves during the exposure, the photo won't be perfectly sharp (you did know that, didn't you?). When you move the camera during the exposure, the same will happen.
To solve this problem you can use a tripod, to sort out camera movement, or flash light in order to freeze the subject. Sometimes you will have to make a concession to depth of field and prefer a faster shutter speed to a small aperture. Or use high speed film. Again, it is very important to do your own experiments here and see what works best for you.
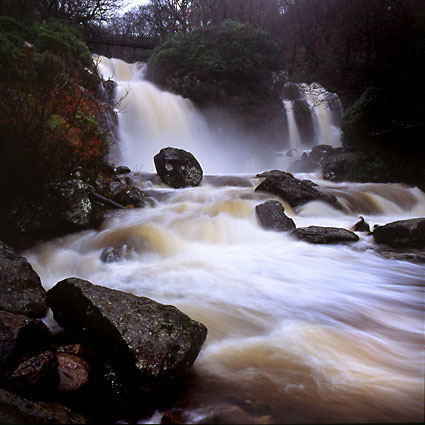
But blur because of movement is not always your enemy. A perfectly sharp picture of a waterfall, or a cyclist is rather unreal. In everyday life we see the falling of water, and a cyclist in perfect rest will fall soon.
Following the subject: Sports and reportage photographers often use the technique of following the subject with the camera. Doing this, you combine panning with a slow shutterspeed, in order to keep it at the same place in the image without freezing the action. This way, the subject will appear sharp, while the background looks washed out in the horizontal direction, thus suggesting movement.
Sharpness seems to be the holy grail of photography of many photographers. There is nevertheless also a large group that works creatively with blur, out of focus, unsharpness. I already discused blur to render movement, or little depth of field to isolate a subject from its surroundings.
 And then there is the kind of photographer that sees the rendering of the out of focus areas as an important quality of a lens. Are those parts smooth or edgy and harsh? Is there a three dimensional feel in the picture, with a smooth transition from in focus to out of focus - or is it an abrupt one?
This is actually an old discussion. Photographers quarelled about this in the sixties, when Japanese gear took over from German optics. The Japanese lenses were (in real or in the mind of some) less three dimensional, more flat. German optics had a nicer transition from in to out of focus.
This bitter struggle of quality (to some) and snobism (to others) is well and alive on the internet - especially for lovers of German lenses - Leica. The nice thing about this, is that the 'quality of the out of focus areas' is known as bokeh - a Japanese word! Bokeh means something like fuzziness (also used to indicate Alzheimer).
The discussion focuses on the importance of bokeh. Some people think that those parts that are out of focus, are not the main subject and therefore it is not important what it looks like. If a lens renders these harsly, so be it. The lens should be sharp - that is important! On the other hand bokeh-lovers stress the fact that out of focus areas are important for the image as a whole. If those parts are rendered ugly, than the quality of the entire image is harmed.
 Often the discussion is about the look of the highlights in the out-of-focus areas, having the same shape as the aperture. This is an optical phenomenon, that cannot be avoided. For instance there is some visible skylight in the background of a photograph, falling through the leaves of a tree. In that case all the 'holes' in the canopy (in the out of focus background!) will have the shape of the aperture. If an aperture consists of 5 blades, than that will show (in my opinion rather ugly) in the final picture. If the aperture consists of 9 rounded blades, then this phenomenon is less strikingly visible.
But is not just the shape of the aperture. More important is the optical design of a lens. When it is highly corrected for spherical aberration, then the out of focus areas often show a harsh bokeh, with double lines. Branches can appear almost twice. The out-of-focus highlights are with such a lens brighter at the edge than in the middle.
What to do? Should a photographer worry? The problem here is, that bokeh cannot be quantified easily (which make some people deny its entire existence, which is rather stupid in my opinion). With the same lens, the out of focus areas of background and foreground can have different qualities. A shot at 2 metres can have a totally different look that something more close.
As a landscape photographer I could easily say it doesn't matter to me - for landscape overall depth of field is required. But I do make some close-ups and for wedding photography it is important as well.
I like pictures that have a three dimensional look. Sensible lighting helps here (use of backlight, atmospheric perspective, etc), but the lens quality is important too. Many Leica optics show more 'depth' then their Nikon cousins. My own 35mm Pentax lenses are far better than most third party lenses I had. My Rollei lenses have a great three dimensional look - but there pentagonal shaped aperture can be a bit of a pain in some situations.
In short: this is a awkward subject, but you can not conclude that it is all humbug - there are real life differences between lenses. Generally, one can say that for the best results, use the best lenses, especially primes. And, very important, get to know your optics. For instance, I know my Pentax 85 2.0 has excellent bokeh, but in absolute sharpness the 100 2.8 macro is a better one.
Sometimes out of focus can make or break the picture, but some ugly bokeh won't destroy a really good image. The quality of a picture is defined by many, many things.
Part 3: real life situations
This article is written by Wim van Velzen, © 2003.
Comments on the article and photographs are welcome!The landscape photographs shown here and lots more are put in several portfolios! More wedding photos can be found in the wedding galleries.
It is also possible to order landscape prints or to use them editorially or commercially.