Wim van Velzen photography - articles
NEDERLANDS |
home |
new |
landscape |
articles |
sitemap |
about |
contact
© Wim van Velzen, Februari 2004
1/219 sec at f 13,043 and 7 meter 12
exposure and focus - part 3: real life examples
Part 1: lightmetering and exposure
Part 2: focusing and sharpness
Part 3: real life situations
- some examples, explaining the way I work - metering, grey grads, bracketing, depth of field
Real life
I discuss some of my landscape images here. How did I meter the light? What did I take into account while focusing and deciding on depth of field (DoF). Of course, there are other ways than mine to achieve the same results!
The original transparencies contain far more detail. Light and shadow detail can therefore not be done justice on a computer screen.
Generally I work this way: I position the camera, put the lens of my choice on it and decide how much DoF I want. Then I set the aperture accordingly. If I want sharpness up to the horizon, I set the lens at the hyperfocal distance, else I focus on the subject. Then I guess the shutter speed (I always use ISO 100 film for landscape; this way guessing is easier).
The next step is setting the same aperture and speed combination on my Pentax MZ5n with 100mm lens, in spotmetering mode. I then meter the relevant parts of the subject: is the grass exactly in the middle of the scale, the snow two stops brighter, are shadows blacked out because they are more than two and a halve stop darker?
When my first guess isn't right (and quiet often I am a stop or half a stop amiss) I change the shutter speed on the Pentax and 'scan' the subject again. As soon as I am satisfied I set the exact shutter speed on my 6x6. My Rollei makes this very easy, because aperture and shutter speed can be set in third stops.
Doing landscape, I always have the camera on a tripod. As a consequence I can use longer shutter speeds to my heart's desire (or light's necessity!). So I am free to choose whatever aperture I need for DoF.
Problems occur when parts of the subject move. Then I have to make a choice: better sharpness of the subject, or more general sharpness because of a larger DoF.
Normal scene:
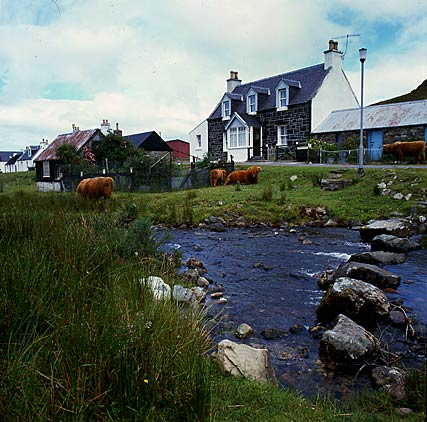 It is quite easy to meter the light when the weather is overcast. The contrasts are not great - apart from the sky to land contrast. The clouds are as a consequence very light in this photograph. But that is also the way we see them.
First I chose the aperture of f16. F22 would have been nice for DoF, but I was afraid the cows would show some movement. I then did a spotmetering with my 35mm SLR, setting the lens at f16. Metering for the grass, which is most of the time middle grey, I metered a shutter speed of 1/15.
The sky was 3 stops brighter, with no detail left as a consequence. Therefore I chose to underexpose half a stop. As the Bronica EC (the camera I used at the time) has only shutter speeds in whole stops, half stops can only be obtained by the aperture. I set the aperture in-between f16 and f22; shutter speed was 1/15.
The sedge on the left hand side was no darker than one and a half stop - no problem.
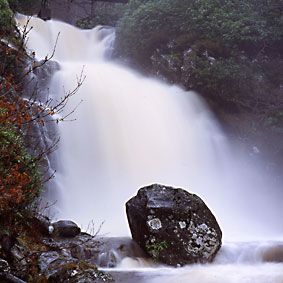
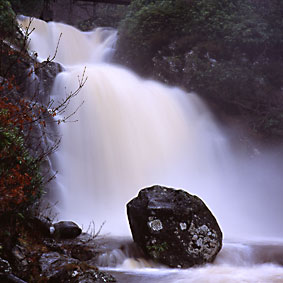
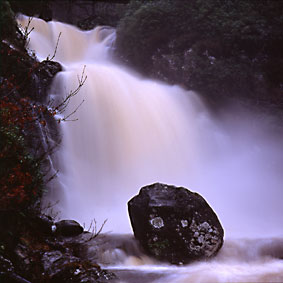
High contrast scene:
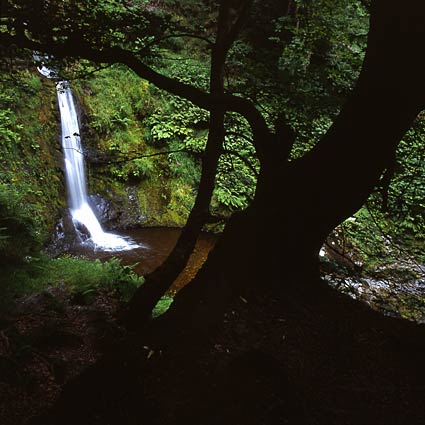 In this kind of situation you have to make a choice. If you want to have the tree well exposed, the waterfall will be overexposed. And vice, of course, versa. Because the tree is more of a frame and the waterfall the real subject, the choice wasn't difficult.
Using the spotmetering mode it was easy to ignore the largest part of the subject. If integral metering had been used, this would have been a difficult one; I doubt whether matrix metering could cope with this one.
I metered the green area near the waterfall and set the indicated aperture and shutter speed on the Bronica. The waterfall was two stops above the metering - an excellent value for something this bright. The tree was more than three stops underexposed in relation to the metering; some of the leaves caught still enough light to be visible.
A scene like this is almost impossible to photograph in sunlight. Contrast is even higher then now, and shadows would disturb the composition.
For focusing I considered the waterfall area to be of prime importance. The main subject should be in focus, shouldn't it? By choosing a small aperture even the tree was quite sharp.
Little depth-of-field:
 Exposure was easy here. I metered for the grass in the middle distance, as that seemed to be middle grey to me. The distant peninsula was still visible.
Be careful when metering for a distant part of the scene. Because of atmospheric perspective (what is distant, is more blue and hazy) the area near the horizon will always be lighter than the close subject.
I wanted to isolate the flowers from their background, without making the latter unrecognisable. Therefore I took a 25cm 4.0 telephoto lens and focused on the flowers. Then I closed the aperture ring slowly, watching what happened to the DoF.
I found f8 the best compromise and then metered with the 35mm camera and 100mm lens at f8 and set the relevant shutter speed on the Bronica.
As a consequence there is little DoF. The subject get the most attention. The backgrounds of broom and sea are still recognisable - especially when seen as part of the entire series of images made on this spot.
Grey grad filter:
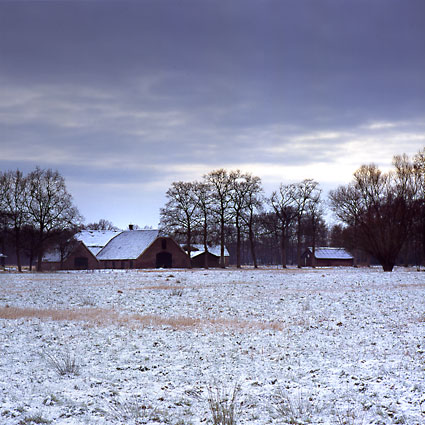 The sun didn't want to penetrate the clouds all morning. Light metering would have been relatively easy: measure for the snow and overexpose two stops.
While I was walking here and thinking about making a picture of this farm house, the sky behind the house opened. The snowy meadow wasn't affected by the brighter light though. Therefore the sky was more than a stop brighter than the snow, and as a consequence I couldn't get any detail in the sky while retaining the brightness of the snow.
Now the one stop grey grad came in handy. Such a filter is for the lower half transparent and colourless; the other half is of a neutral grey. The part of the subject that is exposed through the grey part of the filter is a stop darker than the other part. [ There are grey grads with more than one stop difference. ]
Such a filter can be used to good effect when the sky is too bright exposing for the foreground. [ I could have used the same filter for the photo with the cows, but then the sky might have been too weighty. ]
By using this filter, the snow was still bright, without losing the interval in the clouds. The latter is still perfectly visible amidst the clouds.
As soon as I saw the scene, I knew I would use the 150mm. I also knew that I couldn't get everything in the frame in focus. I set the lens through the distance scale hyperfocally for f16. As I think the scale is too optimistic I closed the aperture to f22.
The grass at the bottom of the photograph still isn't in focus. That is a pity, but it doesn't attract too much attention.
[ For those in the know: this kind of situations make me long for a view camera... ]
Sunset scene:
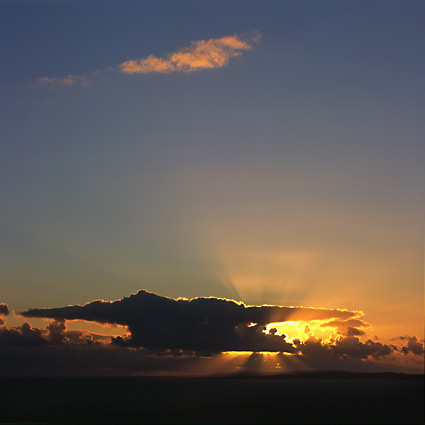 Sunsets (and rises) are less difficult than you might expect. We are used to the fact that during a sunset everything turns dark in the course of less than half an hour. Therefore we can accept brighter and darker versions of the same subject, taken at the same time. As we look at the photograph, we don't know how dark it actually was.
As a rule of thumb one can meter for a piece of nicely coloured cloud and set that metering on the camera. The sun itself and the brightest of sunlight possibly will be without any detail, but that is no problem: the human eye cannot look into the sun either.
For this photograph I metered the yellow-orange sky on the right hand side, at about one-third of the image. The small cloud at the top of the picture gave the same metering. The blue sky at the top was about a stop darker. The light of the sun has no detail, which I didn't mind, as the sun was covered by some clouds. The lack of detail in the white of the sun doesn't attract too much attention now.
Not really visible on the monitor, but very obvious in the original transparency, are the different shades of sea and island. The island is really black, the sea still contains some detail.
Night shot:
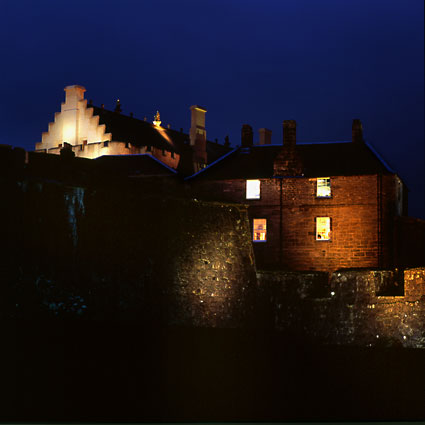 Making pictures at night is not that easy. With artificial light, contrasts are high and finding a piece of middle grey to meter on can be difficult. You actually have to choose what you want to expose for. Lights, like the floodlights here, can get overexposed; it helps to find a composition where these kind of light sources are not in the frame. The shadowy parts can turn to black.
A mistake one easily makes is to render the subject too bright. The human eye sees the night as dark and that should be shown in a photograph. A stop underexposure compared to daylight usually helps to get a more natural effect.
And that is exactly what I did here: the wall of the house on the right hand side would have been half a stop brighter than middle grey in daylight, now it is about half a stop darker.
It is sensible to do some bracketing in these kind of situations!
Focusing was no problem: there is nothing really close to the camera.
Bracketing:
I made a series of frames from the scene below, each time changing exposure for two thirds of a stop. I did this to ensure that one of the frames would keep the water bright, but still detailed.
I did neither dodging nor burning. Original photos on Velvia 100F; Sonnar 150mm @f22, exposure around 1 second.
I focussed on the foreground. As a consequence the background is a bit less sharp (but only very slightly so), but that is hardly visible because of the movement of the water.
 |
two-third of a stop brighter
a lot of detail in the shrubs, but a featureless stream |
 |
original interpretation (and the best one, I think) |
 |
two-third of a stop darker
a lot of detail in the water, but the shadows in the shrubs blocked up |
This article is written by Wim van Velzen, © 2003.
Comments on the article and photographs are welcome!
The landscape photographs shown here and lots more are put in several portfolios! More wedding photos can be found in the wedding galleries.
It is also possible to order landscape prints or to use them editorially or commercially.
return to top